 Mr.G AI Studio
עברית
Client guides
Everything you need to get started with us. Pick a service and a guide, and it opens right here.
Our post stylesA look at what we create
Here's what we can do: 12 post styles, shown on a sample business like yours. There's nothing to choose or send us. We match the styles to your business, so just enjoy the look.
What kind of business are you?
Your field isn't listed? The styles are the same for every business, so pick the closest one.
Love a particular style? When your month's posts come to you for approval, ask for a change and mention the style number (1–12). We'll design it that way.
Tap a picture to see it bigger. The businesses, photos, offers and reviews in these examples are fictional. Your posts use your own colors, logo and photos.
The difference between posting and paid adsA 2-minute read
They're two different things, and each does a different job. Here's what each one does, in short, and what your package includes.
Posting to your business Page
Keeps your Page active, well designed and professional, so it shows your business at its best and builds trust with customers.
Seen mostly by: people who already follow your Page.
Included in your monthly packagePaid ads
Reach new, targeted people, grow your exposure and bring in inquiries from potential customers.
Seen by: people who don't know your business yet, too.
A separate service + an ad budgetWhat's included, and what costs extra
- The monthly package includes 8 designed posts, writing the content, and posting them to your business Page: $99 for the first month, then $199 a month. The bigger package has 12 posts a month: $139 for the first month, then $275 a month.
- Paid ads are a separate service, not part of the package. The ad budget itself is an extra cost too.
The ad budget is paid to Facebook separately. It isn't included in the price of the service or in the campaign management fee.
We set the ad budget together, based on your business goals and the amount you're comfortable investing.
Best of both: a professional presence on your Page, plus targeted exposure to new customers. People who tap an ad and find an active, well-kept Page find it easier to trust your business. 🙌
An ad needs somewhere to send the people who tap it: WhatsApp, a form, or a landing page.
How to create a Facebook business PageOnce, about 10 minutes
A business Page is your business's home on Facebook. It's separate from your personal profile: you manage it from your profile, but it shows under your business name. Without a Page there's nowhere to post for your business or to run ads from.
Many businesses made a Page once and forgot about it, and two Pages for one business confuse customers. Search Facebook for your business name and choose Pages in the results. Found one? Send us the link: no need for a new one.
- Log in to Facebook with your personal profile and open Create a Page.
- Page name: your business name, exactly as on your sign and receipts.
- Category: start typing and pick from the list, for example “Auto repair shop”, “Pilates studio” or “Pet store”.
- Bio: a sentence or two on what your business does and for whom. Then click the button to create the Page.
- Carry on to the details: phone, WhatsApp, address (if customers come to you), opening hours and website. You can skip a step and finish it later.
- Add a profile picture (your logo) and a cover photo (a real photo of your business). ✅
- When you're done, switch back to your own profile: click the profile picture and choose your own name. After creating a Page, Facebook stays on it.
Send us the link to your new Page and we'll take it from there.
Facebook changes its Create a Page screen now and then, but these fields are always there.
How to approve our access to your Facebook PageOnce, about 2 minutes, on a computer
We sent an access request from Mr.G AI Studio to your business Page. You approve it once, and that's it.
It covers posting content only: no access to your settings, ads or money, and you can remove it any time. We never ask for your password.
Who owns your Page?
Where the request waits depends on who owns the Page:
Not sure? Here's how to check
- On a computer, open Facebook and switch to your business Page: click your profile picture in the corner and choose the Page.
- In the Page's menu: Settings › Page setup › Page access.
- Does this screen show a Business portfolio with a name and an ID number? Then a business portfolio owns the Page. Nothing like that? You own the Page, and our request is waiting on this same screen.
We can see this from our side too. If we sent you a link to this guide, it already opens the right way.
- On a computer, open Facebook and switch to your business Page: click your profile picture in the corner and choose the Page. (On a phone the request doesn't always show.)
- In the Page's menu, click Settings, then Page setup › Page access.Settings › Page setupPage setup🔑Page access🕘Page management history✔Page quality
Illustration - Under Pending access requests you'll see Mr.G AI Studio. Click Review request.Partner with accessPending access requestsReview requests from partners who want to help manage your Page.Mr.G AI StudioAccess requested: ContentReview request
Illustration - Approve it. If Facebook asks for your password, that's Facebook's own check: type it there and never send it to anyone. ✅
- When you're done, switch back to your own profile: click the profile picture and choose your own name. Otherwise Facebook stays on the business Page, and your shares go to the Page too.
Don't see the request? Write to us and we'll send it again.
- On a computer, open your requests in Meta Business Suite. More than one business portfolio? Choose the one your Page is in, at the top.
- Find the request from Mr.G AI Studio and click Approve. ✅RequestsMr.G AI StudioRequested access to your PageDeclineApprove
Illustration
Only someone with full control of the business portfolio can approve it. If that isn't you, send this guide to whoever runs it.
Request not there? Add us yourself
- Open Partners in Meta Business Suite.
- Add › Give a partner access to your assets.
- Our Business ID: 1376901507375961
- Choose your Page › Content › Assign.
That's it. Once we've linked your Page, your page with us shows “Your Facebook Page is connected ✓”.
Your screens may look slightly different, but everything is in the same place.
How to make your Instagram a business account and connect it to FacebookOnce, about 5 minutes, on your phone
For us to post on Instagram too, it has to be a business account and connected to your business's Facebook Page. Two short parts, in the Instagram app.
A private account becomes public, as a business account should be. You can switch back to a personal account any time.
Part 1: switch to a business account
Already a business account? Skip to part 2.
- In the Instagram app, tap your profile picture at the bottom, then ☰ at the top (Settings and activity).
- Under For professionals, tap Account type and tools › Switch to professional account.For professionals💼Account type and tools
Illustration - Pick the category that describes your business, tap Switch to professional account again, choose Business and tap Next.
- Add your business contact details (phone, email) and tap Next.
- See Log in to Facebook? Tap it and choose your business's Page, and part 2 is done. Skipped it? Go on to part 2.
Part 2: connect it to your Facebook Page
- On your Instagram profile, tap Edit profile.
- Scroll to Public business information and tap Page › Connect or create › Continue.Public business information📄PageConnect or create
Illustration - Tap Log in to Facebook › Continue. If asked, log in with your personal Facebook, the one that manages the Page.
- Choose your business's Page and tap Connect. ✅
You need full control of the Facebook Page (usually whoever created it). Got an error message? Take a screenshot and send it to us.
That's it. Tell us you've connected it, and we'll add Instagram to your posts.
Your screens may look slightly different, but the button names are the same.
How to connect your WhatsApp to your Facebook PageOnce, about 3 minutes, on a computer
With WhatsApp connected, people can message you on WhatsApp straight from your business Page, and you can run ads that open a WhatsApp chat.
You need the WhatsApp Business app (free) on your business number. Still on regular WhatsApp? You can move to WhatsApp Business with the same number, and your chats come with you. Back up first: the move is one-way.
- On a computer, open Facebook and click your profile picture in the top corner › See all profiles › choose your business Page.
- Click the Page's profile picture in the top corner › Settings & privacy › Settings.
- In the menu, under Permissions, click Linked accounts › WhatsApp.Permissions🔗Linked accounts📷Instagram💬WhatsApp
Illustration - Choose your country code, type your business WhatsApp number and click Send WhatsApp code.
- The code arrives in WhatsApp. Type it and click Confirm. ✅
- When you're done, switch back to your own profile: click the profile picture and choose your own name.
A message says the number is “linked to another Facebook business”? Write to us and we'll help.
Your screens may look slightly different, but the button names are the same.
How to add links to your Instagram bioAbout 2 minutes, on your phone
Your bio can hold up to 5 links: your website, your shop, WhatsApp, a booking form. When a post says “link in bio”, this is where it goes. It only works from your phone.
- In the Instagram app, tap your profile picture at the bottom › Edit profile.
- Tap Links › Add external link.Edit profile🔗Links+ Add external link
Illustration - Paste the address, write a short title (for example “Order online”) and tap ✓.
- Tap Done to save. ✅
Only the first link shows straight away; the rest fold under it. To reorder: Edit profile › Links › Options › Reorder links.
A WhatsApp link
Want a tap to open a WhatsApp chat? Add a link: wa.me/ followed by your full number with the country code and no leading 0 or +. For example, Israeli 054-1234567 becomes wa.me/972541234567.
And on Facebook
On your business Page, the website goes in the Page details: switch to your business Page › About › Contact and basic info › Add a website. When you're done, switch back to your own profile.
Your screens may look slightly different, but the button names are the same.
How to approve your month's postsAbout 5 minutes, on your phone or computer
Every month, your posts come to you first, on your own page with us: the link we sent you on WhatsApp. Nothing is published until you approve it.
- Open your page link and scroll to Posts for your approval. All of the month's posts wait there, each with its picture and the text that goes with it.
- Go through each post: look at the picture and read the text under it. Check prices, offers and your business details especially.
- All good? Tap 👍 Approve, and it shows Approved ✓.Posts for your approvalYour first month's posts3 of 8 reviewed
 Handmade ceramic mug ☕ Each one a little different. That's the beauty.Waiting for you👍 Approve✏️ Request a change
Illustration · Example business - Want something changed? Tap ✏️ Request a change, write what to change and tap Send. For example: “a different headline”, “no price”, “use a photo of the shop”.👍 Approve✏️ Request a changeWhat should we change? A different headline, another photo…Send
Illustration · Example business - At the top you can see how many you've reviewed, for example 3 of 8 reviewed. You can stop halfway and carry on later from the same link.
What happens next?
- Posts you approve, we schedule, and they go up by themselves on their dates.
- When you ask for a change, we get a message straight away, fix it, and the new version waits for you on the same page.
- Each post gets one round of changes.
- Tapped the wrong button? Tap the other one and your choice updates.
A post you haven't approved isn't published. It's best to go through them a few days before the first one.
Love a particular style? Write its number from Our post styles (1–12) in your change request, and we'll design it that way.
How to share a Page post to your personal profileUnder a minute, on your phone
Facebook remembers which profile you're using. If your phone is on the business Page (for example after you approved our access), sharing just posts it to the business Page again, and your friends never see it. So start with a quick check.

This is a phone that's on the business Page: the business name shows next to the photo. Many business Pages use the owner's photo, so always check the name.
- Open the Facebook app and tap the menu (☰, or your small profile picture). The name you're using now is at the top. Is it the business name? Tap the small arrow next to it and choose your own name.Your businessYou're here now▾Your own nameYour business
Illustration - Tap the link we sent. Your business Page opens, and the new post is the first one at the top.
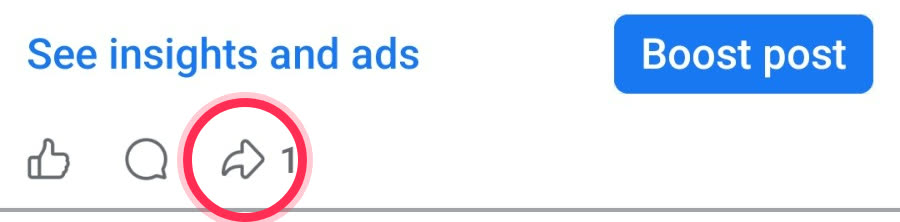
- Under the post, tap the arrow icon (Share).
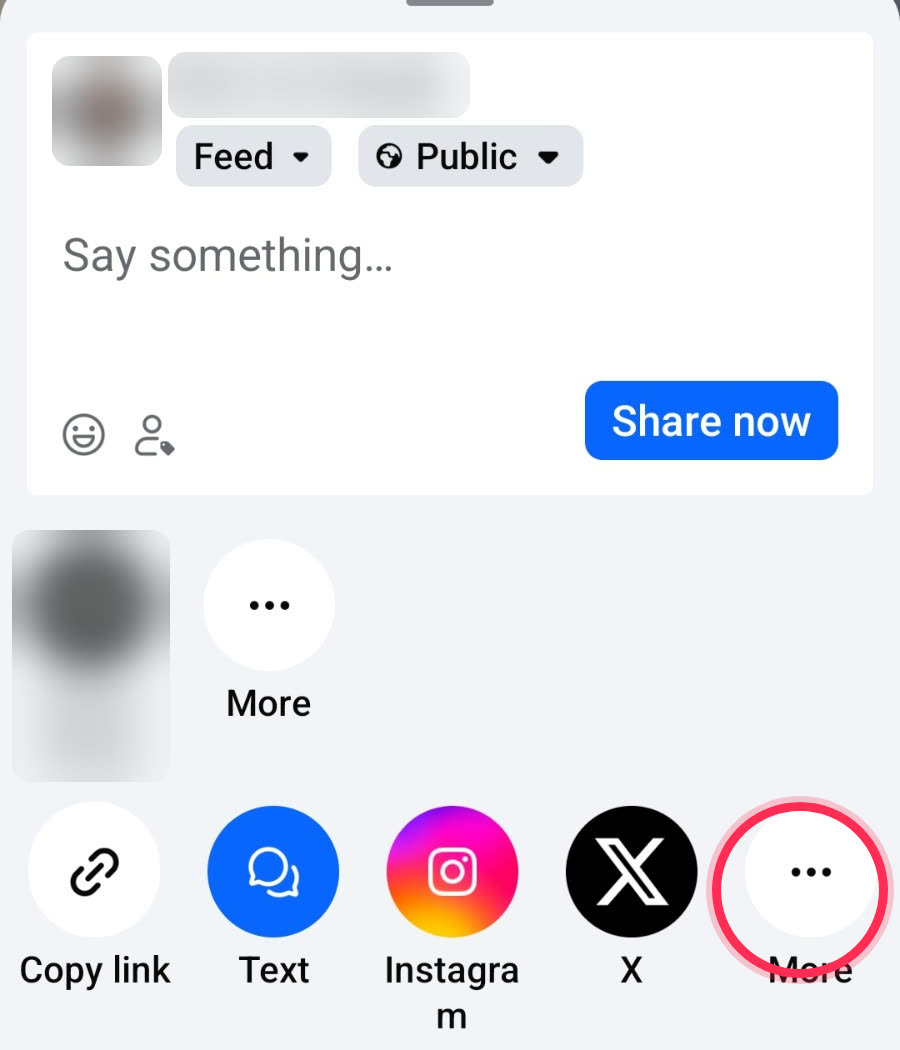
- A panel opens. In the bottom row of icons, scroll to the end and tap "More" (three dots).
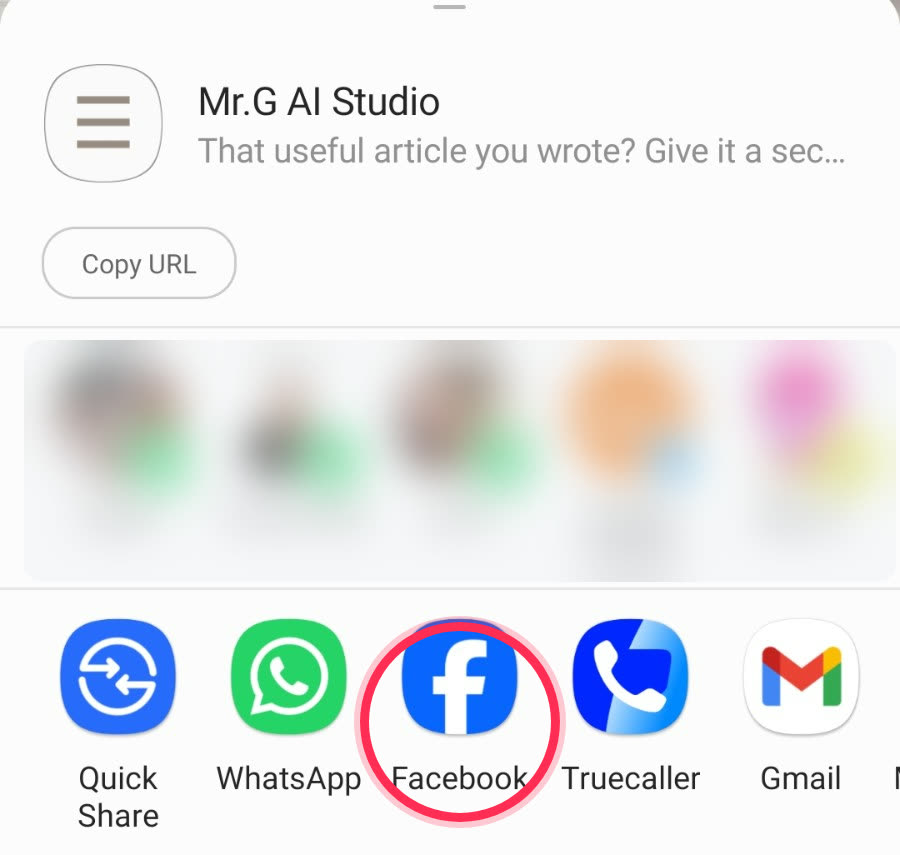
- In the next panel, choose the Facebook icon.
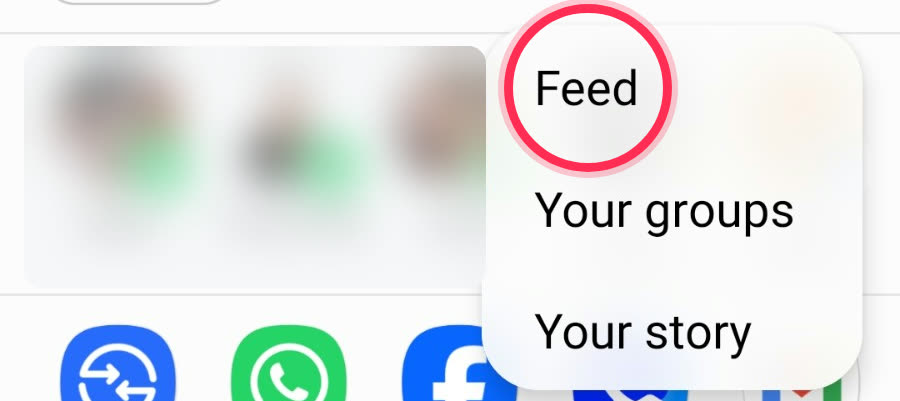
- A small menu opens. Choose "Feed".
- In the window that opens, look at the top, next to the photo: it should say your own name. Business name there? Close the window and go back to step 1. Your name? Tap the post button. Done: the post now shows on your personal profile ✅Your own nameFeed ▾Public ▾
Illustration
Your screen may look slightly different, but the icons and buttons are the same.
What is a landing pageA 2-minute read
A landing page is a single web page built for one goal: getting the visitor to take one action. Leave their details, message you on WhatsApp, call, book, or buy.
People usually reach it by tapping an ad or a link in a post.
How is it different from a website?
Website
Many pages and menus. It tells visitors about your whole business, and they look around and choose for themselves.
Landing page
One page, one offer, one button. No menus to distract, so it's easy to decide and get in touch.
What's on a good landing page?
- A headline that carries on exactly from what the ad promised.
- What the customer gets, in a few short sentences.
- Proof: real reviews and photos of your business.
- One clear button: WhatsApp, a call, or a short form.
Above all, it loads fast and looks good on a phone: most people who tap an ad are on their phone.
Why does it matter for paid ads?
With paid ads, you pay to bring people in. If someone who taps the ad lands on a website's home page, they have to search for themselves, and many leave without getting in touch. A landing page carries on exactly from what the ad promised and leads straight to an inquiry, so more of the clicks turn into inquiries.
You don't always need one: some campaigns send people straight to a WhatsApp chat or a short form inside Facebook. We'll help you choose what fits your business.
How to open an ad account and add a credit cardOnce, about 10 minutes, on a computer
Your ad account is where Facebook charges the ad budget from. It's yours, with your card, and we only get access to build and run the ads in it.
We never see your card details and can't change them. Facebook charges you directly, and every charge shows in your Billing and payments.
Part 1: a business portfolio
Already have a business portfolio in Meta Business Suite? Skip to part 2.
- On a computer, go to business.facebook.com and log in with your personal profile.
- Click the drop-down menu below Home in the top corner › Create a business portfolio.
- Portfolio name: your business's public name, with no special characters. Fill in your first name, surname and business email, then click Create.
- Meta emails you: confirm your email address in it.
Part 2: an ad account
- In Meta Business Suite, go to Settings, and in the menu: Accounts › Ad accounts.
- Click + Add › Create a new ad account.
- Fill in a name for the account (your business name, say), your time zone and the currency you'll pay in. Click Next.
- Choose My business, tick the box agreeing to Meta's terms and click Create ad account.
A new business portfolio can only create one ad account (three once a campaign has run and been paid for), and an account you create stays in the portfolio for good. So don't create test accounts.
Part 3: a credit card
- Right after creating the account you'll see Add payment info: click it. Skipped it? Open Billing and payments, choose your ad account › Payment methods.
- Click Add payment method, choose credit or debit card, click Next and enter your card details as the screen asks. ✅
Part 4: send us the account number
Open Ads Manager: your ad account's name and ID show in the drop-down menu at the top of the page. (You can also take it from the address bar: the number after act=.) Send it to us on WhatsApp, and we'll send an access request.
Next: How to approve us to run your ads.
The button names are from Meta's own help center. Your screens may look slightly different.
How to approve us to run your adsOnce, about 3 minutes, on a computer
We sent two requests from Mr.G AI Studio: to run campaigns in your ad account, and to run ads in your business Page's name. You approve each one once.
It covers building and running ads and seeing the results: no changes to your payment method and no adding people. It's the level Meta suggests for an agency that runs your campaigns, and you can remove it any time. We never ask for your password.
1. Your ad account
- On a computer, open your requests in Meta Business Suite. More than one business portfolio? Choose the one your ad account is in, at the top.
- Find the request from Mr.G AI Studio for your ad account and click Approve. ✅
Only someone with full control of the business portfolio can approve it.
Ad account request not there? Share it with us yourself
- Open Partners in Meta Business Suite.
- Add › Give a partner access to your assets.
- Our Business ID: 1376901507375961
- Choose Ad accounts › your account › Manage campaigns › Assign.
2. Your business Page
For the ads to show in your Page's name, approve the Page request too. It waits in the same place as our access request for posts: How to approve our access to your Facebook Page. Already approved our access for posts? This is a new request: approve it too.
That's it. We'll write to you once the access works, and start building your campaign.
The button names are from Meta's own help center. Your screens may look slightly different.
How to connect Google AdsOnce, about 5 minutes
Your Google Ads account is yours, with your card. We connect to it from our manager account and run your campaigns in it, and you can see everything.
Google charges the ad budget straight to your card. We never see your card details, and your Google Ads customer ID always stays with you.
Do you already have a Google Ads account?
- Send us on WhatsApp the Gmail address you'd like to sign in with.
- We open the account and send an invitation to that address. Open the email from Google Ads and accept the invitation.
- Go to ads.google.com and open Settings under the Billing icon.
- Set up your billing details: your billing country, and a payments profile, Organization for a business (or Individual if that's how your business is registered). Fill in the name, legal name and address.
- In the Payment methods section, click Add payment method, enter your card details and confirm. ✅
You may see a small verification charge on your card. It usually disappears within a week, and there's nothing to do.
- Send us your Google Ads customer ID: 10 digits like 123-456-7890, shown at the top next to your account name.
- We send a link request to your account from our manager account.
- Open Google Ads, click the Admin icon › Access and security › the Managers tab.
- Under Link request you'll see Mr.G AI Studio. In the Actions column, accept it. ✅ You can also accept straight from Google's email.
You need admin access to the account. Campaigns running in it right now? Tell us before we connect, and we'll go through them together.
That's it. We'll write to you once the connection works, and start building.
The button names are from Google's own help center. Your screens may look slightly different.
Google advertiser verification: what it is and what to doOnly if Google asks, about 10 minutes
Google asks some advertisers to verify who they are. The name and country you confirm then show in your ads' details, so people know who's advertising.
Verification belongs to whoever pays for the ads, which is you, and only an admin on the account can complete it. It's Google's own check: we will never ask you to send us an ID card or documents.
- When Google asks, a notice appears in your account and you get an email. We see it too, and we'll send you the link.
- Click the link, sign in with your account's Gmail and fill in what Google asks for: usually your business details and an ID document, sometimes one more short step.
- Submit it. Google's review can take up to 5 business days. ✅
Verification has a deadline. If it isn't done by then, Google pauses your ads until it is, so don't put it off.
What we need to get started3 invites to our email, about 10 minutes
To work on your website and your presence on Google, we need access to three places. In each one you simply add our email:
Our email: golan1411@gmail.com
- Editor on your websiteso we can fix the site and publish articles
- Google Search ConsoleGoogle's tool that shows how your site appears in search
- Your Google Business Profileyour business card on Google Search and Maps
We never ask for a password. In each place you stay the owner, you see what we do, and you can remove us any time.
Someone else built or runs your website? Send them the link to the website editor guide. It takes them a minute.
Not sure whether you have Search Console or a Business Profile? That's fine. Write to us and we'll check together, or set them up.
How to add us as editors of your websiteOnce, about 2 minutes, on a computer
So we can fix the site, improve it and publish articles, add our email as an editor in the tool your website is built with.
Our email: golan1411@gmail.com
What is your website built with?
- On a computer, sign in at lovable.dev with the account the site was built in, and open your website's project.
- Click Share at the top.
- Paste our email, choose the role Editor and send the invite. ✅
Edits made through Lovable's AI assistant use your account's credits. That's why we work on the code directly whenever we can, so we don't spend your credits.
Button names are from Lovable's own docs. Your screen may look a little different.
Send us the tool's name on WhatsApp, or the address of your site's admin screen, and we'll send you the exact steps.
How to add us to Google Search ConsoleOnce, about 2 minutes
Search Console is Google's free tool that shows how many people saw your site in search, what they searched for and what problems the site has. The numbers in your monthly report come from it.
Our email: golan1411@gmail.com
- Sign in to Search Console with your Google account and pick your site at the top.
- In the side menu, click Settings › Users and permissions.
- Click Add user.
- Paste our email, choose Full permission and save. ✅
Only an owner of the site in Search Console can add users.
Your site isn't there, or you don't have Search Console? No problem. Once we're editors of your website we'll set it up ourselves and add you as the owner.
Button names are from Google's help center. Your screens may look a little different.
How to add us to your Google Business ProfileOnce, about 2 minutes
Your Business Profile is the card that shows when people look up your business on Google Search and Maps: phone, hours, reviews and photos. As managers we can improve it and keep it up to date for you.
Our email: golan1411@gmail.com
- Sign in at business.google.com with the Google account that manages the business.
- Click the More icon (⋮) › Business Profile settings › People and access.
- Click + at the top and paste our email.
- Under Access, choose Manager and click Invite. ✅
You stay the owner. A manager can't add or remove people on the profile.
No Business Profile, or can't find it? Write to us. We'll check whether one exists, and if not, we'll set it up together. Google verifies a new business itself, which can take a few days.
Button names are from Google's help center. Your screens may look a little different.